If you are managing a large group of users in a Terminal Services or Citrix environment and some or all of those users will need to be configured to be able to scan from their workstation, running the RemoteScan™ installation file for each user may not be a feasible proposition. For those administrators, RemoteScan™ has provided a solution that may help. The rslogon.bat file can be found in any RemoteScan™ client installation directory, or it can be downloaded from the RemoteScan™ web site here:
http://www.remote-scan.com/downloads/rslogon.bat
The key to setting up one, or many, users on a Terminal Server/Citrix server is to insure that a certain set of files is located in each users homedrive/homedir. If you run the RemoteScan™ client installation for any user on the Terminal Server, and then look in that user's homedrive/homedir you will see the following set of files and directory under the user's windows directory:
TWUNK_16.exe
TWUNK_32.exe
twain.dll
twain_32.dll
Twain_32 <DIRECTORY>
As long as those five items are in the users homedrive/homedir, they will be able to scan. Now, getting those files there can be accomplished by running the remotescan install as that particular user on the server, by copying over the files into their account in one of many ways, or by using the rslogon.bat file as a logon script. The rslogon.bat file in its downloaded form simply checks for the existence of the required files in the proper directory for the user account that is logging in. If those files are not there the script will copy them from a specified directory into the proper location, enabling scanning for that user.
To get the rslogon.bat file to execute properly, there is some setup that is required. First, as is typical for logon scripts in Terminal Services, you will need to place the rslogon.bat file into your shared netlogon directory. The way the script is written it is looking for the RemoteScan files in a subdirectory called RemoteScan under the netlogon folder. So, if browsing the netlogon folder, it should look something like this for a non active directory setup: 
Now, for an active directory environment, the netlogon folder is typically located here:
%SystemRoot%\sysvol\sysvol\<domain DNS name>\scripts
Where %SystemRoot% is the windows install directory. So, here is an example of what the directory structure may look like in an AD setup. 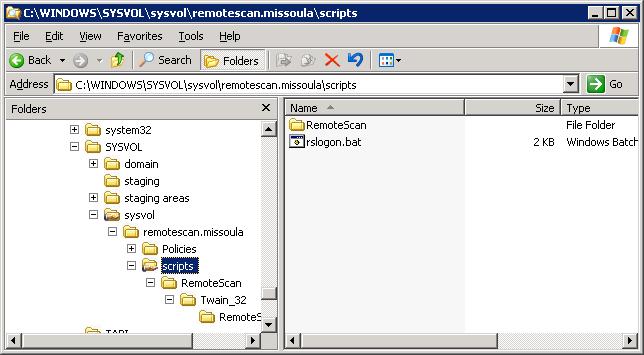
Now, the RemoteScan™ files can be placed anywhere that is accessible, but if it is a different location than the specified directory, you will need to make a change to the rslogon.bat file to specify the new location. To do that, you will want to open the rslogon.bat file to edit, and then look for the following lines of code:
net use v: %LOGONSERVER%\netlogon
set srcPath=v:\RemoteScan
As you can see, it sets a mapped drive (v:) to the servers \netlogon folder and then looks in the RemoteScan sub-directory. If you need to change the location of the files, you will need to update these lines of code in the rslogon.bat file.
Once you have these files in place and the rslogon.bat file modified if needed, then it is simply just a matter of specifying the logon script file for whichever users you want to have scanning access. In a non AD environment, this is done by going to the administrative tools and then "computer management". From there, go to the local users and groups. 
Now right click on the user you want to have scanning privledges and go to properties. Selecting the profile tab will reveal an area to specify the logon script. Simply place "rslogon.bat" in there, and then it is all done. 
For an AD environment, the setup is nearly identical, except you will go to the "Active Directories Users and Computers" and then go to the "Users". From there, it is the same, right click on the user and go to the properties. Then click on the profile tab and place "rslogon.bat" in the logon script edit area. That should do it.
One advantage to having Active Directories setup is that you can apply a setup script to a group policy so that the script will execute for anyone who is a member of that group, this saves the hassle of having to setup the rslogon.bat for every new user. To do this, you will need to set the proper setting to allow this. The setting in Group Policy is "User Configuration", "Windows Settings", "Scripts (Logon/Logoff)", "Logon". The simplest way to do this is to copy the rslogon.bat script to the Windows clipboard, open the "Logon" setting in the Group Policy editor, press the "Show Files..." button, and paste the rslogon.bat file in the dialog. You can select the file and edit it in this dialog as well. Presto, it now works for all users who are a member of whatever group you set this up for.
That should do it. Every time that user logs on, it will check for the existence of those files in their homedrive and homepath and then copy them over if need be.
Revision 1 posted to RemoteScan Wiki by DELL-Jay W on 4/15/2015 5:16:24 PM